Quick start guide
Prerequisites
Rust
This sample code is tested with Rust version 1.89.0.
Java
This sample code is tested with:
OpenJDK Runtime Environment Homebrew (build 17.0.16+0).
OpenJDK 64-Bit Server VM Homebrew (build 17.0.16+0, mixed mode, sharing).
Client authentication certificate
To create a client authentication certificate:
Sign in to DigiCert ONE.
In the top-right corner, select the profile icon > Admin profile > Client authentication certificates.
Select Create client authentication certificate.
Provide the following information:
Nickname
This name is the display name on the Admin details page in the Authentication certificates section. The name must be unique and only include letters, numbers, spaces, dashes, and underscores.
End date
Enter the certificate expiration date.
Note when the authentication certificate expires. You must generate a new certificate and update all API integrations using the certificate before it expires. If you don't, the API token integration will stop working.
Encryption
Select an encryption algorithm to use for securing communications. DigiCert recommends AES (Advanced Encryption Standard), which is the default selection.
Signature hash algorithm
Select a hash function to use for verifying data integrity. DigiCert recommends SHA-256, which is the default selection.
Select Generate certificate.
Copy the certificate's password and store it in a secure location. You will need to use it later when installing the certificate or using it in your certificate request. This password is required for installation and API requests. You will not be able to retrieve it later.
Select Download certificate. You cannot download it again. If lost, you must generate a new certificate.
Remember the file path to your client authentication certificate, you will need to reference it later.
Select Close.
Credential ID
Your credential ID is the nickname of User certificate in Content Trust Manager. Copy the user certificate nickname and use it in your request body.
In the Content Trust menu, select Certificates.
Hover your cursor over certificate nickname.
Select the Copy icon.
PIN
You will receive an email with the subject line of Sign with your digital ID once your user certificate is created. This email includes the PIN associated with your user certificate via email. Make sure you keep this email safe so that you can easily retrieve it for signing images.
Certificate content
To copy your user certificate content:
In the Content Trust Manager menu, select Certificates > User certificates.
Select the certificate nickname you want to use.
On the Certificate details page, scroll down to Certificates and select the Copy icon.
Note
NOTE: Ensure you remove any line breaks from the certificate content.
Quick start guide
Create a Rust project
To create the project named java_rust_ffi, run:
cargo new java_rust_ffi
Place the certificate
Copy Certificate_pkcs12.p12 in the new folder.
Move lib.rs
Move lib.rs file to the src directory.
Create Java project structure
Inside java_rust_ffi, create:
java/org/example
Then, place C2paTest.java inside example.
Edit lib.rs
a. Open src/lib.rs and update host and certificate details with your own credentials.
const SAD_API_URL: &str = "https://clientauth.demo.one.digicert.com/documentmanager/csc/v1/credentials/authorize";
const SIGNING_API_URL: &str = "https://clientauth.demo.one.digicert.com/documentmanager/csc/v1/signatures/signHash";
const CLIENT_CERT_PATH: &str = "Certificate_pkcs12.p12";
const CLIENT_CERT_PASS: &str = "_IRX_7WZgHMG ";
b. Make the edits below to update the file with your Credential ID and PIN.
let request_body = SADRequest {
        credentialID: "basic_np-14-08-2025-11-01-44-165".to_string(),
        numSignatures: 1,
        hash: vec![hash.to_string()],
        PIN: "sha123".to_string(),
    };
    let request_body = SignRequest {
        credentialID: "basic_np-14-08-2025-11-01-44-165".to_string(),
        SAD: sad.to_string(),
        hash: vec![hash.to_string()],
            signAlgo: "Your signAlgo".to_string(),
            signAlgoParams:
"MDSgDzANBglghkgBZQMEAgEFAKEcMBoGCSqGSIb3DQEBCDANBglghkgBZQMEAgEFAKIDAgEg"
            .to_string(),
         };
Update certificate content
Update lib.rs file with your user certificate content.
In the Content Trust Manager menu, select Certificates > User certificates.
Select the certificate nickname you want to use.
On the Certificate details page, scroll down to Certificates and select the Copy icon.
Note
NOTE: Ensure you remove any line breaks from the certificate content.
Replace Cargo.toml
Replace Cargo.toml in java_rust_ffi with the one provided in references.
Replace main.rs
Replace src/main.rs with the provided main.rs in references.
Build Rust library
Change directory to the one you created by using cargo new <directory_name> before running the commands below. In the sample code, this is java_rust_ffi.
Run cd <directory_name>. In the sample code, this is cd java_rust_ffi.
To build Rust library, run commands:
cargo clean
cargo generate-lockfile
cargo update
cargo build --release
Copy compiled library
This build places the compiled library in target/release/. Create a folder lib inside your project directory java_rust_ffi. Then copy the compiled library libc2pa_rs.dylib to the lib folder.
The compiled library looks different in different operating systems. For example:
macOS: libc2pa_rs.dylib
Linux: libc2pa_rs.so
Windows: c2pa_rs.dll
Download JNA
Go to Maven Central JNA - https://repo1.maven.org/maven2/net/java/dev/jna/jna/
Download a recent jar. (Example: jna-5.14.0.jar).
Place it into your project’s lib/ folder.
Copy lib folder
Copy lib now populated with the files jna-5.14.0.jar and libc2pa_rs.dylib into java/.
Create C2paLibrary.java
In java/org/example, place the file C2paLibrary.java from reference files.
Add images you want to sign
Create a folder called Images in the Java folder. Place all images to be signed in the Images folder.
This code sample considers that an image A.jpg is placed inside the folder ...java/Images. The image path that needs to be signed is provided in C2paTest.java. You are able to change the input file name/ path in C2paTest.java.
Compile and run Java
Setup JAVA_HOME:
export JAVA_HOME="/opt/homebrew/opt/openjdk@17/libexec/openjdk.jdk/Contents/Home"
export PATH="$JAVA_HOME/bin:$PATH"
Change directory to java by running command:
cd java
Compile:
javac -cp ../lib/jna-5.14.0.jar org/example/C2paLibrary.java org/example/C2paTest.java
Run:
java -cp .:../lib/jna-5.14.0.jar -Djava.library.path=../lib org.example.C2paTest
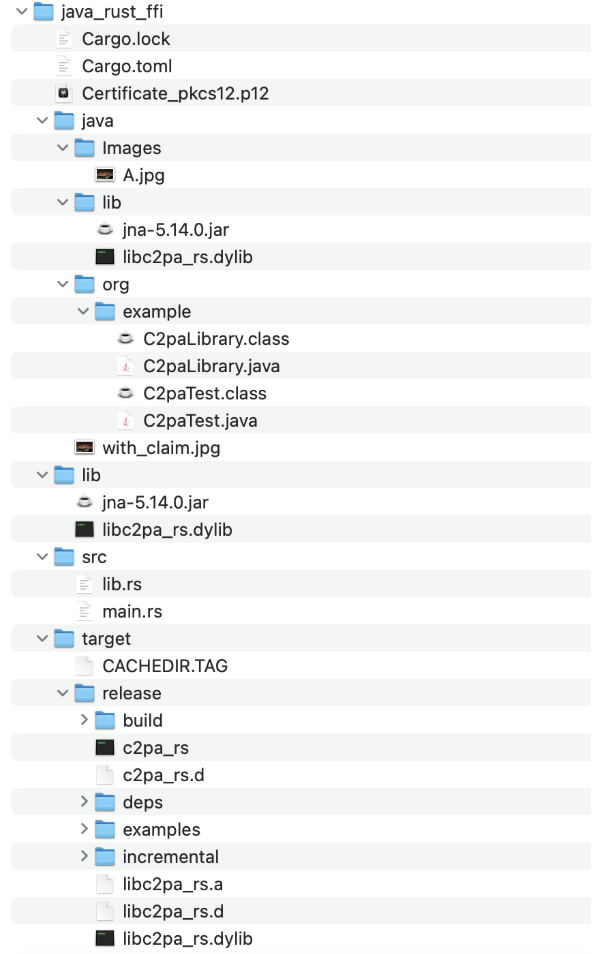
Verify project setup
Verify your project setup with the below screenshot:

Signed image
Output signed image with_claim.jpg is generated in the folder java/. The path/ filename of the signed image is provided in C2paTest.java. You may change the output file name/ path in C2paTest.java.