NanoSSL server integration
9 minute read
With TrustCore SDK NanoSSL server, devices may securely connect to remote peers.
Server integration process overview
This table describes the tasks for integrating a NanoSSL server into devices. Some tasks are optional and may not be relevant for a deployment. To determine whether to perform a particular task, read the beginning of each section.
| Task | Reference |
|---|---|
| Add the TrustCore SDK NanoSSL server software to the application development environment. | Building Components |
| If there is no pre-configured TrustCore SDK port for the operating system, edit the appropriate abstraction files to port the code to the operating system. | Porting TrustCore SDK Code |
| Specify which products (e.g., NanoSSL server), functions (e.g., debugging and examples), and features will be included in the TrustCore SDK executable by setting the appropriate compilation flags. | |
| For example, to incorporate synchronous and asynchronous NanoSSL servers into a system, define the following flags: | |
| ENABLE_MOCANA_SSL_SERVER | |
| ENABLE_MOCANA_SSL_ASYNC_SERVER_API | |
| ENABLE_MOCANA_SSL_DUAL_MODE_API | Building TrustCore SDK Components |
| NanoSSL compilation flags | |
| Create the object files and executable and verify that TrustCore SDK code may execute on the operating system. | Building TrustCore SDK Components |
| Using TrustCore SDK NanoCrypto FIPS Binaries for Linux | |
| Add calls within the application’s code to the TrustCore SDK functions for initialization and shutdown, and then set up threads for any required TrustCore SDK components. | |
| When shutting down the SSL stack, the calling order should be: | |
| SSL_releaseTables | |
| SSL_shutdownStack (or SSL_shutdown in release 6.5 and older) | |
| MOCANA_freeMocana | Common TrustCore SDK initialization |
| Add calls within the application’s code to the TrustCore SDK functions for NanoSSL server setup and message processing, and optionally certificate management. | Implement NanoSSL server |
| Optionally, if certificate management functions do not already exist within the application, add calls to the TrustCore SDK certificate management functions for performing certificate validation. | CERT_STORE_* functions in the NanoSSL API Reference. |
Synchronous and asynchronous support
The source code distribution of NanoSSL server supports both synchronous and asynchronous message handling.
- For socket-based systems (for example, using TCP/IP), synchronous methods should be used (see Synchronous server process flow).
- For environments without RTOS, the asynchronous methods must be used (see Asynchronous server process flow).
- For everything else (e.g., TCB, event-driven, upcall-based, EAP, and asynchronous stacks), the asynchronous methods should be used (see Implement NanoSSL server).
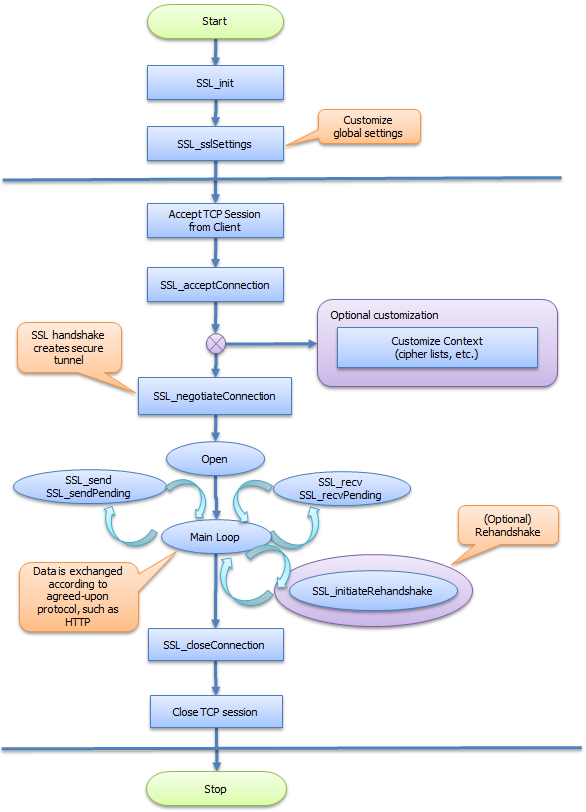
Synchronous server process flow
This figure shows the NanoSSL synchronous server process flow.
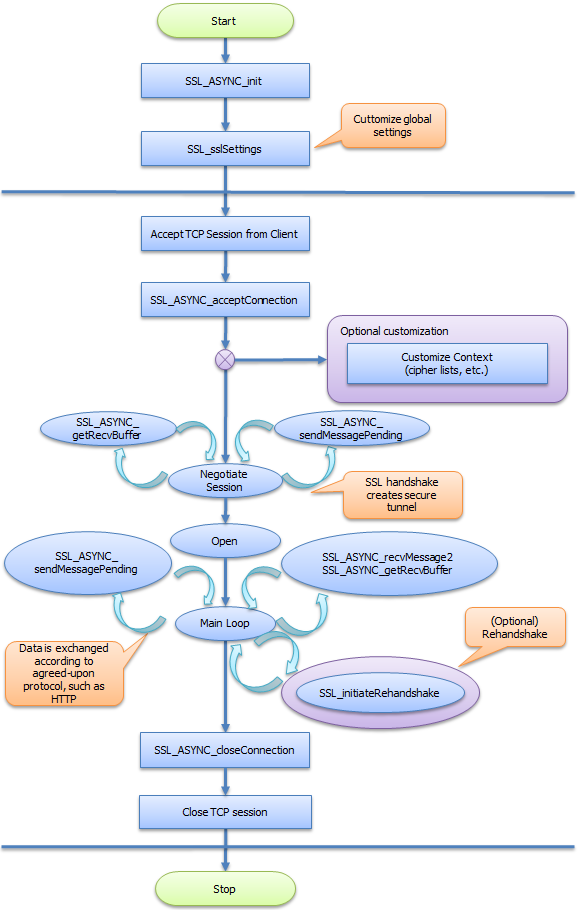
Asynchronous server process flow
This figure shows the NanoSSL asynchronous server process flow.
Build NanoSSL server sample code
To help with integration of a NanoSSL server into devices, a suite of sample code is included in the source distribution (in the ${MSS_SRC_PKG}/src/ examples directory) to quickly build a NanoSSL server and demonstrate its features. It comprises the following files:
ca_mgmt_example.c— Performs authentication with certificates by using the TrustCore SDK certificate management functions.mocana_example.c— Initializes TrustCore SDK code.ssl_example.c— Implements a secure, synchronous HTTP server.ssl_example_async.c— Implements a secure, asynchronous HTTP server.ssl_loopback_example.c— Implements asynchronous client-server loop-back communication.
The sample code should be used as a reference and modified as required for inclusion into an application’s source code. The sample code may also be used to verify NanoSSL client-NanoSSL server communication.
Note
The moptions.h file does not need to be updated to generate this build; however, if a makefile other than the one provided by DigiCert is used, the following flags need to be added:
__ENABLE_MOCANA_EXAMPLES____ENABLE_MOCANA_SSL_SERVER__
The following sections describe tasks that may be performed to generate and run sample NanoSSL server code:
Note
NanoSSL Server samples link to NanoSSL and core libraries. Refer to the FAQs to build the required libraries before proceeding with sample build.Generate a sample NanoSSL server
To generate a sample NanoSSL server:
- Change to the
projects/nanossldirectory:cd projects/nanossl - Run the following command:
./build.sh --clean --debug --suiteb ssl_server
Generate a sample TLS v1.3 NanoSSL server
To generate the TLS v1.3 sample NanoSSL server:
- Change to the
projects/nanossldirectory:cd projects/nanossl - Run the following command to build the NanoSSL library with support for TLS v1.3:
./build.sh --clean --debug --suiteb ssl_server
Disable TLS v1.3 and features
By default, TLS v1.3 is enabled when the NanoSSL server is generated.
To disable TLS v1.3 and features:
- Change to the
projects/nanossldirectory:cd projects/nanossl - Run the following command to build the NanoCrypto library with TLS v1.3 features disabled:Where
./build.sh --clean --debug --suiteb ssl_server<disable-feature>may be:--disable-0rtt: Disables the 0-RTT feature.--disable-psk: Disables the PSK feature.--disable-tls13: Disables TLS v1.3.
Run the NanoSSL server
To run the sample NanoSSL server:
- Run the following NanoSSL server sample code using the applicable command (i.e., using options for TLS or TLS v1.3).
- For TLS:where additional
./bin/ssl_server <options><options>include:?— Displays the help.-ssl_port <ssl port>— Specifies the port number of the SSL server.-ssl_servername <ssl server name>— Specifies the SSL server’s name.-ssl_certpath <path to files>— Specifies the directory path to the certificate files.-ssl_server_cert <cert name>— Specifies the name of the server certificate.-ssl_client_keyblob <blob name>— Specifies the name of the client key BLOB file.
- For TLS v1.3:where additional
./bin/ssl_server <options><options>include:-ssl_max_early_data_size <size>— Specifies the maximum early data size accepted when using the PSK for connection. This value is sent with the session ticket to the client.
- For TLS:
Verify NanoSSL server functionality
To verify and run the NanoSSL server functionality with NanoSSL client, generate the sample NanoSSL client:
- Change to the
projects/nanossldirectory:cd projects/nanossl - Run the following command:
./build.sh --clean --debug --suiteb ssl_client - Run the NanoSSL client with the correct IP address, port number and server name to connect to NanoSSL server.
Verify NanoSSL server functionality with a web browser
To verify and run the NanoSSL Server functionality with a web browser:
- Start the NanoSSL server with the correct certificate and key. By default, the server IP address is 127.0.0.1 and listens on port 1440.
- Open a web browser, which acts as the SSL client, and navigate to https://127.0.0.1/a. The server terminal displays all the debug information, handshake messages, and the HTTPS request from the browser; the web browser displays the data sent by server.
- Optionally, request additional data from the server, use the following URLs in the browser:
- To tell NanoSSL server to send 100,000 bytes in 1 KB blocks:
https://127.0.0.1/ab - To tell NanoSSL server to send 10 million bytes in 1 KB blocks:
https://127.0.0.1/ag - To tell NanoSSL server to send 100,000 bytes in 16 KB blocks:
https://127.0.0.1/b - To tell NanoSSL client to shut down the NanoSSL server:
https://127.0.0.1/q
- To tell NanoSSL server to send 100,000 bytes in 1 KB blocks:
Use externally generated private keys with NanoSSL
When generating the certificate, ensure that the Common Name matches the -ssl_servername option.
For example, to use a generated key and certificate when starting the NanoSSL server:
./ssl_server -ssl_port 1440 -ssl_certpath keystore -ssl_servername www.sslexample.com -ssl_server_cert dsa_cert.der -ssl_server_keyblob dsa_key.pem
To generate a private key for use with NanoSSL:
- Generate the RSA key and certificate. For example:
openssl genpkey -out rsa_key.pem -algorithm RSA -outform PEM -pkeyopt rsa_keygen_bits:2048openssl req -x509 -new -days 3650 -key rsa_key.pem -outform DER -out rsa_cert.der - Generate the DS keypair and certificate. For example:
openssl genpkey -genparam -algorithm DSA -out dsap.pem -pkeyopt dsa_paramgen_bits:2048openssl genpkey -paramfile dsap.pem -out dsa_key.pemopenssl req -x509 -new -days 3650 -key dsa_key.pem -outform DER -out dsa_cert.der - Generate the ECDSA keypair and certificate. For example:
openssl ecparam -out ec_key.pem -name prime256v1 -genkeyopenssl req -new -key ec_key.pem -x509 -nodes -days 365 -outform DER -out ecdsa_cert.der - Generate the p12 file.
openssl pkcs12 -export -inkey [private key filename] -in [certificate filename] -out cert.p12
Implement NanoSSL server
This table lists NanoSSL products and features that may be enabled, the flags required to enable them, and the required callback functions that must be customized and registered. (Both NanoSSL client and server are listed because they share a common code base.)
To integrate a NanoSSL server into an application, add calls to the functions provided by TrustCore SDK for NanoSSL server initialization, socket and connection management, message processing, and NanoSSL server shutdown, as shown in the ${MSS_SRC_PKG}/src/examples/ssl_example.c sample module.
In particular, the functions and tasks described in below should be performed in the order shown, making calls to either the synchronous or asynchronous methods as appropriate.
| Task | Synchronous reference | Asynchronous reference |
|---|---|---|
| Initialize NanoSSL server’s session manager. | SSL_init | SSL_ASYNC_init |
| Set up certificates: create a certificate store, add identities and CA certificates to the store, and associate the certificate with the SSL connection. | CERT_STORE_* functions, in the NanoSSL API Reference. | CERT_STORE_* functions, in the NanoSSL API Reference. |
| Initialize NanoSSL server’s internal structures: | SSL_initServerCert | SSL_ASYNC_initServer |
| SSL_initServerCert | ||
| Customize and register upcalls (callbacks) for all desired products and features. | Enabling NanoSSL and NanoDTLS products and features | |
| SSL_sslSettings | Enabling NanoSSL and NanoDTLS products and features | |
| SSL_sslSettings | ||
| Open a TCP socket connection to the NanoSSL server. | The application’s existing methods. | The application’s existing methods. |
| Establish a connection between the device and a web browser. | SSL_acceptConnection | SSL_ASYNC_acceptConnection |
| Negotiate SSL handshaking. | SSL_negotiateConnection | Not applicable for asynchronous communication. |
| Loop to continuously process packets. | SSL_send | |
| SSL_sendPending | ||
| SSL_recv | ||
| SSL_recvPending | SSL_ASYNC_sendMessage | |
| SSL_ASYNC_sendMessagePending | ||
| TCP read of data via SSL_ASYNC_recvMessage | ||
| SSL_ASYNC_recvMessage2 | ||
| SSL_ASYNC_getRecvBuffer | ||
| SSL_ASYNC_getSendBuffer | ||
| Invoke the asynchronous upcall to begin application communications | ||
| Reclaim device and SSL/TLS server resources. | SSL_closeConnection | SSL_ASYNC_closeConnection |
| Close TCP socket connection to NanoSSL server. | The application’s existing methods. | The application’s existing methods. |
| Optionally, shut down the SSL stack to enable SSL/TLS server to listen to a different port during its next session. | SSL_shutdownStack | Not applicable for asynchronous communication. |
Optional NanoSSL server functions
This table lists the optional functions that NanoSSL may also perform.
| Optional function | Description |
|---|---|
SSL_enableCiphers | Limit which ciphers to use (for performance or security reasons). |
SSL_getCipherInfo | Retrieve the connection’s cipher and eccCurves. |
SSL_getInstanceFromSocket | Retrieve the connection instance for a socket identifier. |
SSL_lookupAlert and SSL_sendAlert | Retrieve the SSL alert code for a TrustCore SDK error. |
SSL_getSocketId | Retrieve the socket identifier for a connection instance. |
SSL_ioctl (also see SSL_ioctl) | Dynamically enable and/or disable selected features for an SSL session’s connection instance. |
SSL_Settings_Ioctl | Dynamically enable and/or disable global settings for NanoSSL Server. |
SSL_isSessionSSL | Determine whether a connection instance represents an SSL/TLS server, an SSL/TLS client, or an unrecognized connection (for example, SSH). |
SSL_setSessionFlags | Set session flags. |
SSL_getSessionStatus | Get session’s connection status. |
SSL_setVersionCallback | Log the TLS version during negotiation (using the __ENABLE_MOCANA_SSL_VERSION_LOG_CALLBACK__ compilation flag). |
SSL_setDHParameters | Inject pre-generated DH prime and group parameters into a server session (accept and async_accept). |
SSL_setCookie and SSL_getCookie | Store and retrieve custom information for a connection instance’s context. |
SSL_releaseTables and SSL_shutdownStack | Shutdown sequence must be as follows: |
SSL_setCipherAlgorithm | Set ciphers, supported groups, signature algorithms, and certificate signature algorithms to be used during TLS v1.3 negotiation. |
SSL_sendKeyUpdateRequest | Invoke the flow to update the keys used to encrypt/decrypt application data. |
SSL_setServerSavePSKCallback | Save PSK generated and send to client. |
SSL_setServerLookupPSKCallback | Look up for a PSK based on the identity sent by the client. |
SSL_setMaxEarlyDataSize | Set the maximum early data size to accepted with a particular PSK in 0RTT flow. |
SSL_setRecvEarlyDataSize | Set the maximum size of the early data that may be received by server. |
SSL_sendPosthandshakeAuthCertificateRequest | Initiate the flow to authenticate client after handshake is completed. |
SSL_setEarlyData | Set application data to be sent as early data in the 0-RTT flow. |
SSL_serializePSK | Serialize PSK data. |
SSL_deserializePSK | De-serialize PSK data. |
SSL_setMinRSAKeySize | Set the minimum size of the RSA key used in the connection. |
SSL_setSha1SigAlg | Enable/disable the SHA-1 signature algorithm. |
SSL_setFIPSEnabled | Enable/disable FIPS. |
SSL_setClientCAList | Set the list of accepted CAs on the server. This CA list is sent in the Certificate Request message. |
SSL_populateMutualAuthCertStore | Populate the certificate store for mutual authentication per session. |
SSL_enableSrtpProfiles | Set the SRTP profiles to be used by the DTLS SRTP feature. |
SSL_enableHeartbeatSupport | Enable heartbeat support for the connection. |
SSL_sendHeartbeatMessage | Send the heartbeat message. |