Use case examples
11 minute read
This section describes typical NanoSSH Client use cases and explains how to build applicable TrustCore SDK example code:
Use NanoSSH client for shell (remote) access
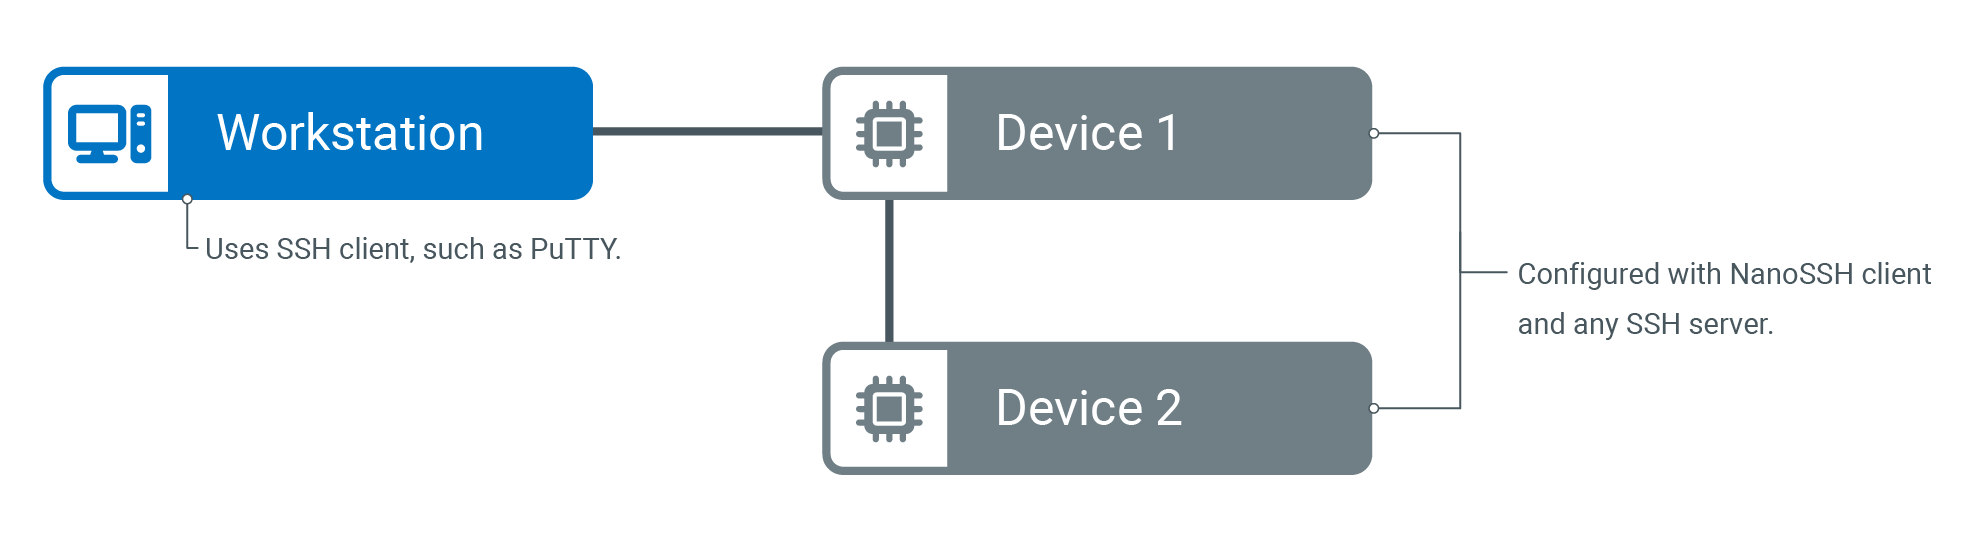
The NanoSSH client shell provides a secured communication channel between two networked devices. The typical usage is to log in to a remote machine and execute commands, as shown below.
Before you begin
Add the NanoSSH client shell example code and supporting software (such as TrustCore SDK code) to the application’s development environment. Make sure to include the sshc_shell_example.c file. See Add TrustCore SDK code to your environment for more details.
Build the shell access example code
Standard Edition
- Configure login credentials
- In the
sshc_shell_example.cexample code file, change the following login credential variable values to match the SSH server (such as NanoSSH server or any other SSH server):sshc_exampleUserName[]sshc_examplePassword[]sshc_exampleIPAddress
- In the
- Set compilation flags
- Specify which features to be included in the NanoSSH client executable by setting the appropriate compilation flags. For the NanoSSH client shell example code, the basic flags include:
__ENABLE_MOCANA_SSH_CLIENT____ENABLE_MOCANA_EXAMPLES____ENABLE_MOCANA_SSH_RSA_SUPPORT__
- The following flag must not be defined:
__ENABLE_MOCANA_SSH_FTP_CLIENT__
- Specify which features to be included in the NanoSSH client executable by setting the appropriate compilation flags. For the NanoSSH client shell example code, the basic flags include:
- Build the executable
- Create the object files and executable using the following commands:
make -f make/Makefile.<os> cleanmake -f make/Makefile.<os> sshc
- Create the object files and executable using the following commands:
- Verify the NanoSSH client execution
- Verify that the NanoSSH client example code executes successfully in the environment.
- See Verifying Communication between the client Shell and the NanoSSH server, Verifying NanoSSH client Shell Communication with Any SSH server
- Repeat steps 4 to 6 as needed to add features one at a time.
Community Edition
Run the following commands from the root of the cloned repository:
- Generate build system and enable the shell example:
cmake -DBUILD_SAMPLES=ON \ -DENABLE_SSH_CLIENT_SHELL_EXAMPLE=ON \ -B build -S . - Compile everything (including object files and executable):
The shell client executable is written tocd build makebuild/samples/bin/ssh_client.
cmake with additional -D flags, then rebuild with make.Verify communication between NanoSSH client shell and NanoSSH server
After building the NanoSSH code, verify that it executes in the operating environment. Assuming that the NanoSSH client and NanoSSH server (and the example code) have been enabled, the loopback interface may be used to confirm that the client and server are able to communicate within the operating environment.
If using only the NanoSSH client but not the NanoSSH server, see Verifying NanoSSH client Shell Communication with Any SSH server.
To verify communication between the client shell and the NanoSSH server:
Standard Edition
- If necessary, open a command shell on the NanoSSH server (e.g., Cygwin).
- Change to the mss directory.
- Start the appropriate executable; for example, for NanoSSH server:
Messages are displayed as processes and methods start up and run.bin/sshs.exe - Open a second shell (the client), and enter the following command to request a connection for the admin user:
The system prompts for the corresponding password.ssh admin@127.0.0.1 - When prompted for the corresponding password, enter the default password, secure.
- When prompted to enter a new password, type any password; for example, new.
- When prompted to confirm the password, type it again. The client echoes “Password changed” and “Password successfully changed”.
- In the client window, press any keys. If they are echoed to the client window (i.e., if you can see what you are typing), asynchronous client-server communication is successful.
- Perform a graceful shutdown by entering the following command in the client window type:
The client and server sessions end, and both command shells are closed.Bye!
Community Edition
- Run the following command:
Leave the terminal running.export LD_LIBRARY_PATH=lib/:crypto_lib/linux-x86_64/:$LD_LIBRARY_PATH./samples/bin/ssh_server -port 8818 - In a new terminal window, set the library path, and start the client:
If the connection succeeds, you receive the server’s shell prompt. All input you type is executed on the remote host.export LD_LIBRARY_PATH=lib/:crypto_lib/linux-x86_64/:$LD_LIBRARY_PATH./samples/bin/ssh_client -ip 127.0.0.1 -port 8818 -username admin -password secure
Verify NanoSSH client shell communication with any SSH server
It is recommended to verify basic NanoSSH client communications with an SSH server before beginning custom code implementations. This process is easily done using the NanoSSH client shell or SFTP example code, as follows.
The following procedure assumes that Cygwin is used to interface to a UNIX/Linux-like development system. For other environments, modify the commands accordingly.
To verify NanoSSH client shell communication with any SSH server:
Standard Edition
- Configure the NanoSSH client example code:
- If the NanoSSH client executable does not include the NanoSSH client example code from the
sshc_shell_example.cfile, modify the makefiles to include this file. - Define the necessary compiler flags in the
moptions.hfile. - Open the
sshc_shell_example.cfile for editing and locate the following lines:static const char sshc_exampleUserName[] = "admin"; static const char sshc_examplePassword[] = "secure"; static const char *sshc_exampleIPAddress = "127.0.0.1"; static const unsigned short sshc_exampleServerPort = 22; - Edit the values so that they match the user’s credentials and system’s IP address, and then save and close the file.
- Rebuild the executable, making sure to do a “clean” build.
- If the NanoSSH client executable does not include the NanoSSH client example code from the
- Start the SSH server.
- Open a command shell and start the NanoSSH client. The NanoSSH client example code securely connects (via HTTPS) to the SSH server, dumps debug information to a temporary command prompt window, and then automatically terminates.
- Stop the SSH server.
Community Edition
To connect to the sample NanoSSH server built from the same repository:
- Edit
samples/ssh_client/src/sshc_example.c(path is relative to the repository root) and update the following variables to match your target SSH server:static const char sshc_exampleUserName[] = "admin"; static const char sshc_examplePassword[] = "secure"; static const char *sshc_exampleIPAddress = "127.0.0.1"; static const unsigned short sshc_exampleServerPort = 22; - Run the following command:
Leave the terminal running.export LD_LIBRARY_PATH=lib/:crypto_lib/linux-x86_64/:$LD_LIBRARY_PATH./samples/bin/ssh_server -port 8818 - In a new terminal window, set the library path, and start the client:
If the connection succeeds, you receive the server’s shell prompt. All input you type is executed on the remote host.export LD_LIBRARY_PATH=lib/:crypto_lib/linux-x86_64/:$LD_LIBRARY_PATH./samples/bin/ssh_client -ip 127.0.0.1 -port 8818 -username admin -password secure
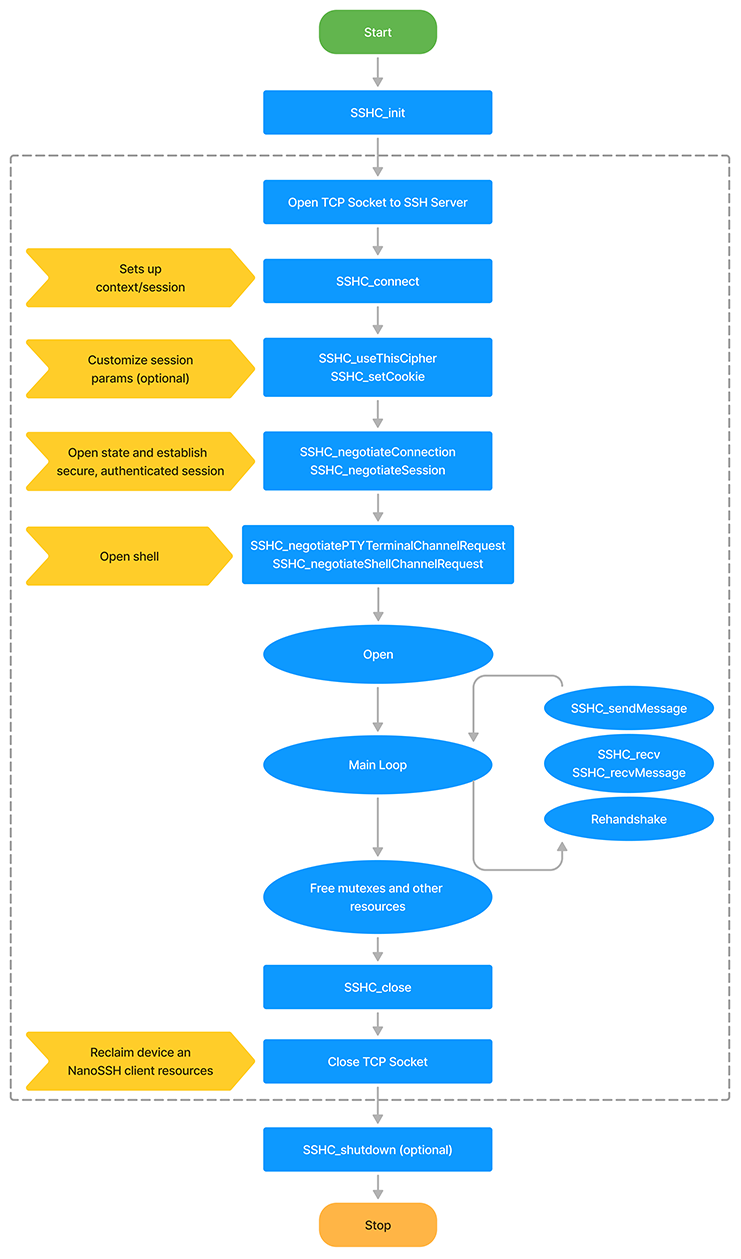
Client shell integration flowchart
The following flowchart shows the NanoSSH client shell integration. For detailed steps to customizing the NanoSSH client shell implementation, see Customizing a client implementation.
Use NanoSSH client for secure file transfer
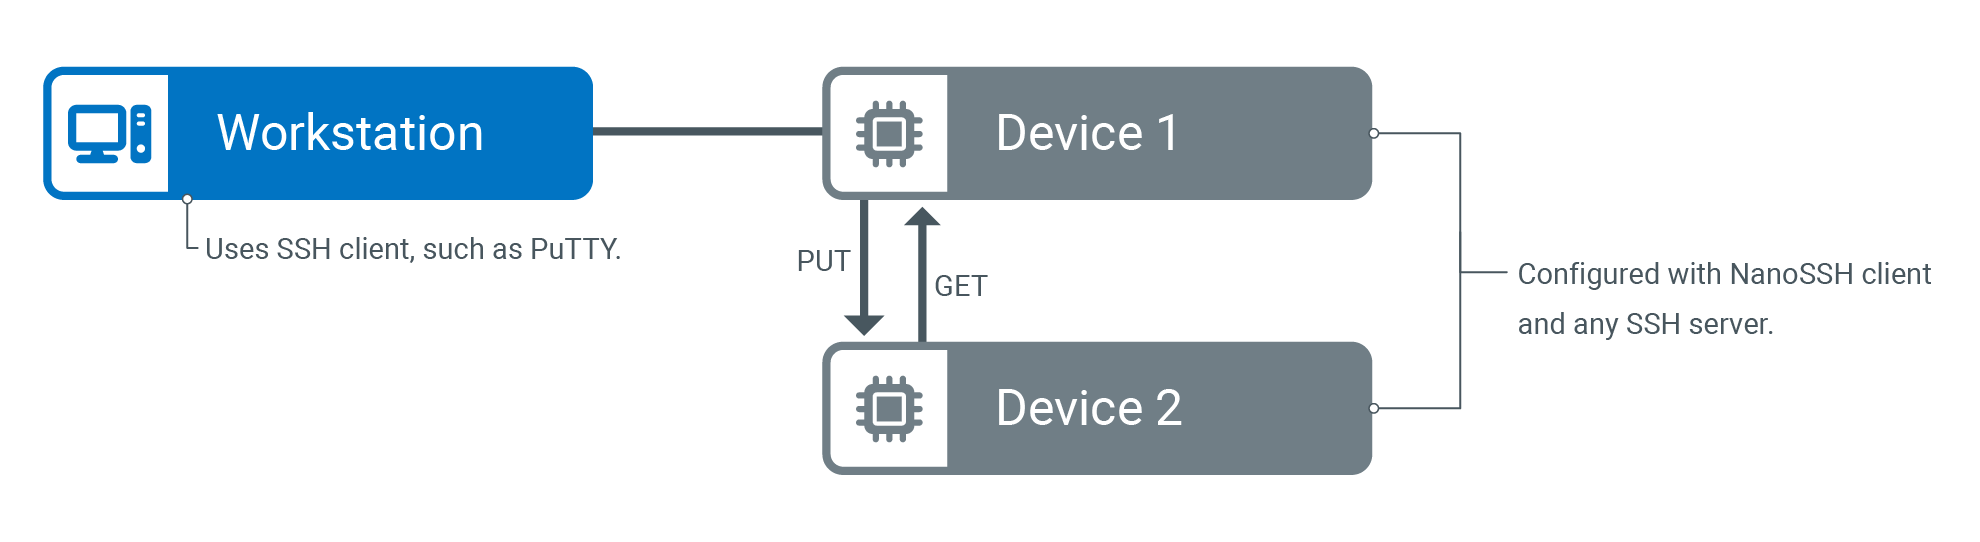
The NanoSSH SFTP client enables secure writing (PUT) and retrieval (GET) of files to/from a remote machine; for example, to retrieve an updated image file from a server and to write a log file to the server, as shown below.
Build SFTP example code
Standard Edition
- Add the NanoSSH SFTP example code and supporting software (such as TrustCore SDK code) to the application development environment.
- Be sure to include the
sshc_example.cfile.
- Be sure to include the
- If there is no pre-configured TrustCore SDK port for the operating system, edit the appropriate abstraction files to port the code to the operating system.
- In the
sshc_example.cexample code file, change the following login credential variable values to match the SSH server, which may be NanoSSH server or any SSH server:sshc_exampleUserName[]sshc_examplePassword[]sshc_exampleIPAddress
- Create the object files and executable. The commands are:
make -f make/Makefile.<os> cleanmake -f make/Makefile.<os> sshc
- Verify that the TrustCore SDK NanoSSH SFTP client example code executes in the environment.
- Repeat step 5 and step 6 as needed to add features one at a time.
Community Edition
- From the root of the Community Edition repository, run the following commands to compile all samples (including SFTP):
cmake -DBUILD_SAMPLES=ON -B build -S . cd build make - Confirm that the expected binaries exist:
ls samples/bin/ssh_client samples/bin/ssh_server - Open Terminal A and set the runtime library path, then launch the sample server on port 8818:Leave this terminal running.
export LD_LIBRARY_PATH=lib/:crypto_lib/linux-x86_64/:$LD_LIBRARY_PATH ./samples/bin/ssh_server -port 8818 - Open Terminal B, set the same library path, and start the SFTP client:If the connection succeeds, the client enters SFTP mode and is ready for file-transfer commands such as
export LD_LIBRARY_PATH=lib/:crypto_lib/linux-x86_64/:$LD_LIBRARY_PATH ./samples/bin/ssh_client -ip 127.0.0.1 -port 8818 -username admin -password securels,put, andget.
Verifying NanoSSH client SFTP communication with any SSH server
Be sure to verify basic NanoSSH SFTP client communications with the SSH server before beginning custom code implementations. This process is easily done using the NanoSSH client shell or SFTP example code, as follows:
- Open Cygwin and change to the directory where the TrustCore SDK distribution package ZIP file was extracted.
- If any source code or makefiles have been modified since the sshc target was last built, rebuild the executable:
./script/nanossh/ssh_client/build_ssh_client_ncrypto.sh
- Run the example code executable:
./bin/ssh_client
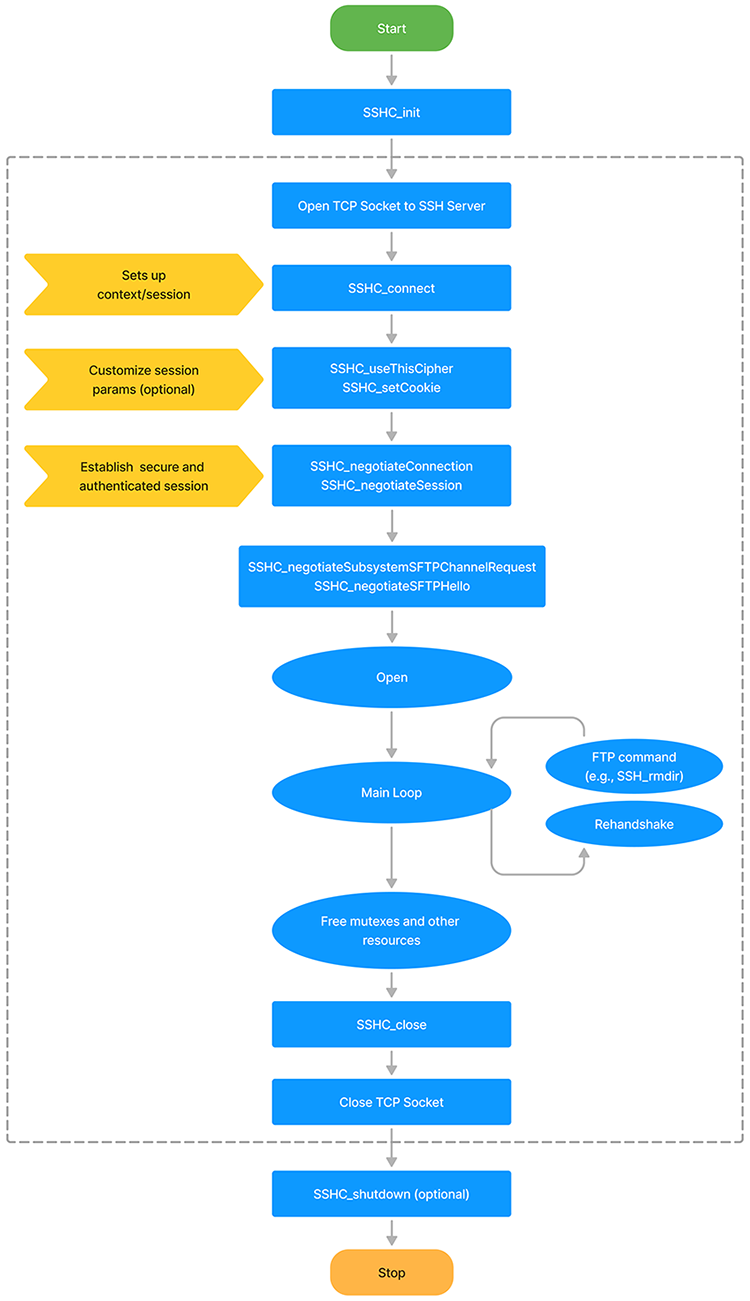
NanoSSH SFTP client integration flowchart
The following flowchart shows the NanoSSH SFTP client integration. For detailed steps to customizing the NanoSSH SFTP client implementation, see Customize a client Implementation.
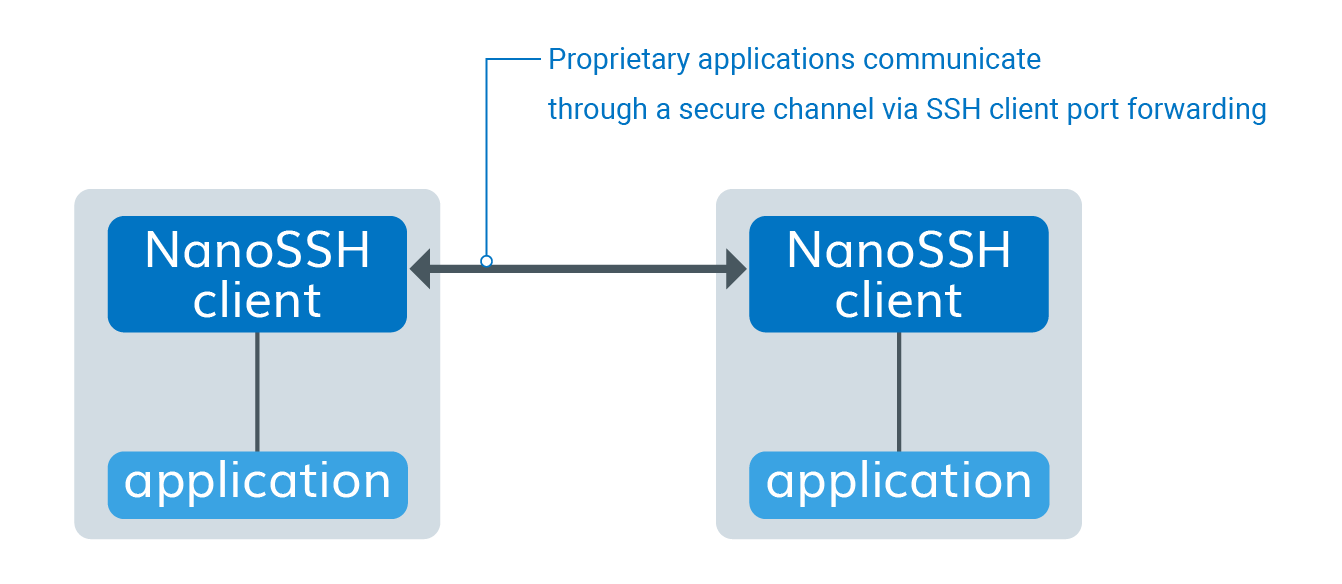
Use NanoSSH client for port forwarding
NanoSSH client port forwarding encrypts and decrypts TCP/IP traffic. A typical application, as shown in Figure 6 below, is for proprietary applications that are operating on distributed machines to securely communicate over any network or the Internet using TCP/IP.
Building the port forwarding example code
- Add the NanoSSH port forwarding example code and supporting software (such as TrustCore SDK code) to the application development environment.
- Be sure to include the
sshc_pf_example.cfile.
- Be sure to include the
- If there is no pre-configured TrustCore SDK port for the operating system, edit the appropriate abstraction files to port the code to the operating system.
- In the
sshc_pf_example.cexample code file, change the following values to match the environment’s:CONNECT_HOSTsshc_exampleUserName[]sshc_examplePassword[]sshc_exampleIPAddress
- Create the object files and executable. The commands are:
make -f make/Makefile.<os> cleanmake -f make/Makefile.<os> sshc
- Verify that the NanoSSH client example code executes in the environment.
- Repeat step 5 and step 6 as needed to add features one at a time.
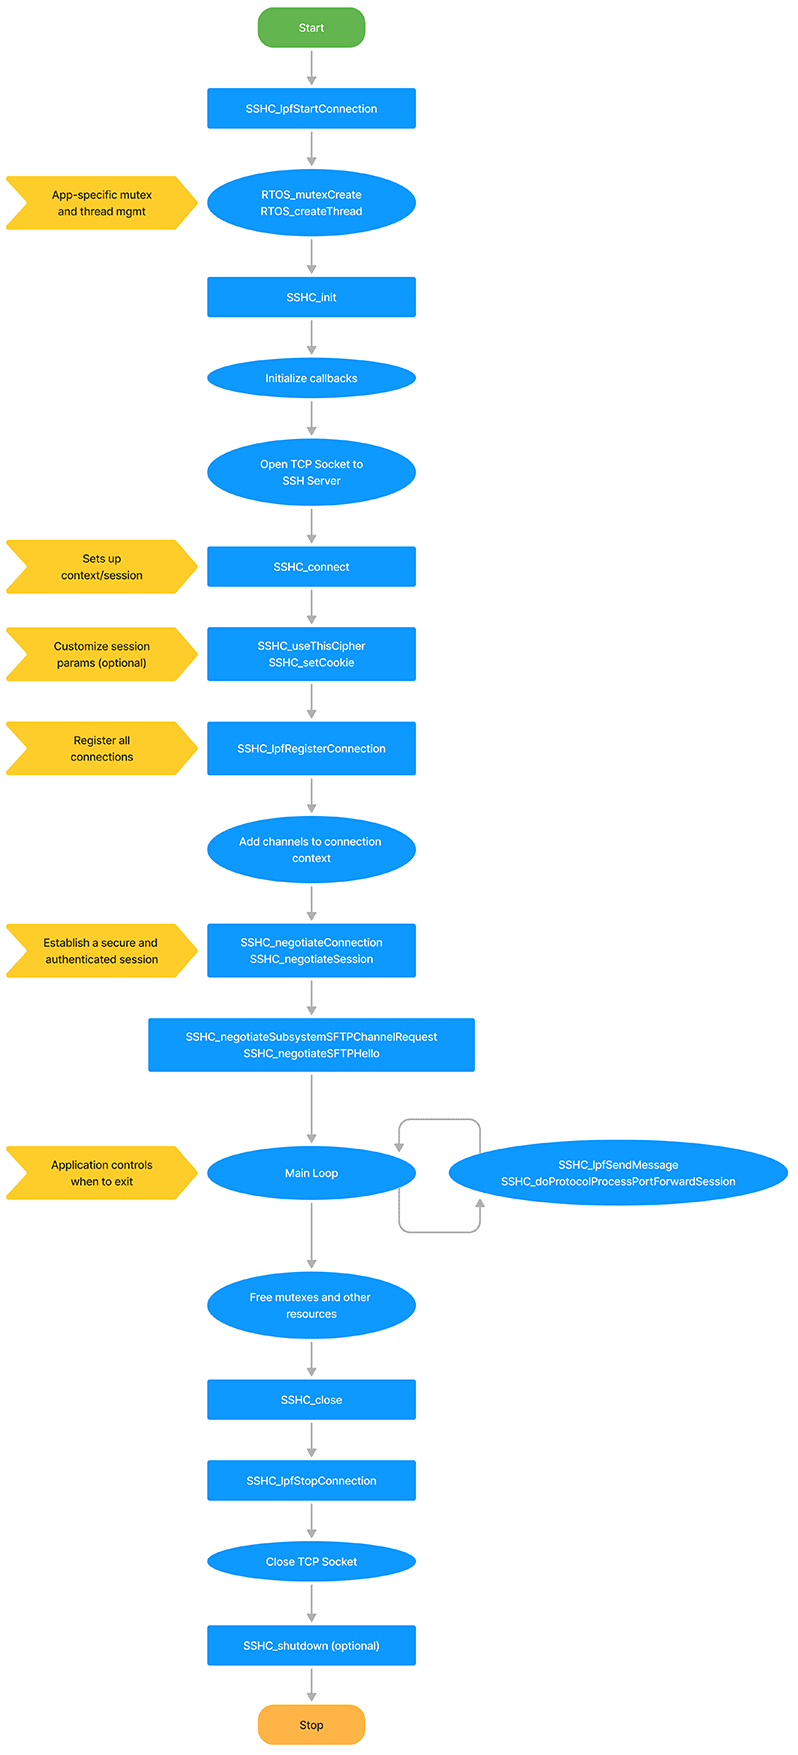
Client port forwarding integration flowchart
The following flowchart displays the NanoSSH client port forwarding integration.
Use NanoSSH client for reverse port forwarding
SSH reverse port forwarding lets you reach a device that can only make outbound connections (because it sits behind a firewall or NAT) by routing traffic through a public “relay” host.
| Role | Runs on | Responsibility |
|---|---|---|
| Isolated device | Private network | Opens an outbound SSH session that requests reverse port forwarding. |
| Relay host | Publicly reachable VM/server | SSH server that accepts reverse-forward requests and relays traffic. |
| Remote user/device | Any location | Opens a normal SSH session to the relay to reach the isolated device. |
Why and when to use it
- Inbound blocked, outbound allowed. Your target device lives on a locked-down network but can open outbound TCP connections.
- No firewall changes. You avoid reconfiguring NAT rules or requesting new ports from network admins.
- Ad-hoc or permanent access. Keep the tunnel up permanently (service/watchdog) or start it only when remote access is required.
How the workflow unfolds
- Isolated device dials out. It initiates an SSH session to the relay and asks the relay to listen on a specific port.
- Relay binds the port. It exposes that port externally and links it to the tunnel.
- Remote user connects. They SSH (or otherwise TCP-connect) to the relay’s exposed port. The relay pipes that traffic through the tunnel to the isolated device.
- Bi-directional exchange. From here, traffic flows both ways—remote ↔ relay ↔ isolated—as if there were a direct connection.
Implementation reminders
- Isolated-side client still hooks standard SSH port-forward callbacks plus the events for registering/canceling reverse forwards.
- Relay server needs
AllowTcpForwarding yes(and oftenGatewayPorts yes) and handlers for reverse-forward requests. - Remote-side client behaves like a regular port-forwarding SSH client; no extras required.
Building the reverse port forwarding example code
- Add the NanoSSH reverse port forwarding example code and supporting software (such as TrustCore SDK code) to the application development environment.
- Be sure to include the
src/examples/sshc_rpf_example.cfile.
- Be sure to include the
- If there is no pre-configured TrustCore SDK port for the operating system, edit the appropriate abstraction files to port the code to the operating system.
- In the
sshc_rpf_example.cexample code file, change the following values to match the environment’s:CONNECT_HOSTsshc_exampleUserName[]sshc_examplePassword[]sshc_exampleIPAddress
- Use the
sshc_rpf_example.csample code’s implementation “as-is” or modify it as desired. - Create the object files and executable. The commands are:
make -f make/Makefile.<os> cleanmake -f make/Makefile.<os> sshc
- Verify that the NanoSSH client example code executes in the environment.
- Repeat step 4 to step 6 as needed to add features one at a time.
Implementing Reverse Port Forwarding for a NanoSSH client
- (Optional) Set up environment-specific thread support.
- The example client creates a thread for each channel opened in the port-forwarding tunnel, and the code sets up lpfTable to track information about the open channels. To avoid thread conflicts, a mutex is used for access control.
- Initialize the NanoSSH client’s session manager, internal structures, and NanoSSH client-specific settings.
- Customize and register upcalls (callbacks) for all desired products and features:
- Replace stub functions with the corresponding custom routines, modeling them after the NanoSSH client example code.
- Register the callbacks as required.
- Set up management for authentication keys.
- Set up a TCP/IP socket connection with the remote SSH server (NanoSSH or any SSH server).
- Initialize the SSH session context.
- (Optional) Customize the session establishment, such as to override the default choice of the strongest available cipher and specify a particular cipher suite instead.
- Set up a secure and authenticated SSH session with the remote server.
- If using the NanoSSH SFTP client, open an SFTP session and negotiate SFTP version support.
- Send a remote port forwarding request to the SSH server to establish the client-server link.
- The tunnel with a remote device is not established yet and not created until after the server uses the established client-server link to forward a connection request from a remote device.
- Verify that the client-server link was successfully established.
- Allocate the resources that the application needs for receiving data on the connection.
- Loop continuously to process messages from the SSH server and from local ports.
- Close the connection.
- Shut down the NanoSSH client and reclaim device and NanoSSH client resources.
Testing a NanoSSH client-SSH Server Link
To test whether an SSH client-server link is successfully established, use code similar to that in the sshc_rpf_example.c sample code, as follows:
- If the function returns an OK status within the configured timeout, a link has been established.